Sunday, June 4, 2017

LAMPRAIS RECIPE


Call it what you want... Lamprais, Lampries, Lump Rice... it still refers to a delicacy that is the ultimate Sri Lankan culinary experience in one pack. 


This recipe is not my claim to the authentic Lamprais at all, although I have tried to stay as close to the methods, and ingredients as I can. 

The components (sides) are the same as the so-called 'authentic' Lamprais, however, I have made chicken Frikkadels rather than beef, and used green plantain instead of than ash plantains.

Once the green plantain is fried, it tastes identical to Ash Plantain. So don't think twice about opting for it. Green plantains are the
unripe bananas that can be easily found in any supermarket, or Latina grocery stores anywhere in the USA. Find them in the bins in the vegetable section. They are sold individually, not in bunches like the ripe bananas.


Frozen Banana Leaves 
A note about banana leaves: They are available in the freezer section alongside the Spanish food and come packaged flat. So if it is your first time shopping for it, you would need to look closely in the freezer, as they may not be displayed upright. When using, they do not require defrosting. They soften the moment it is taken out of the package and is ready to use.

If using fresh banana leaves, wash them well. Then either cut away the rib that goes along the middle of the leaf, or slice it to thin it down. Hold the leaf a few inches above the heat (electric stove top) or low flame (as in a gas cooker). Do not place it directly on the heat as it will catch fire. Move the leaf from left to right as it turns a darker shade of green. It will take about 5 minutes depending on the heat source. The leaf is softened then, making it easier to fold. Otherwise it will split open from the ridges. 

Chicken 'Frikkadels' by Aasai Rasai
The Frikkadels (Dutch forcemeat balls) recipe is inspired by Charmaine Solomon's recipe from her book, "The Complete Asian Cookbook". I made some changes to the recipe to suit my preference by using lean ground chicken breast, and skipped frying the onions in butter, opting instead to mix all the ingredients together and fry like Sri Lankan Cutlets.

What I love about Charmaine's recipe is the idea of adding fresh Dill. I had not used Dill before, so the flavor was really unique and refreshing to me. The closest substitute to Dill is Parsley. 

Making Lamprais was a tiring thought. I did realize though, that I had made nearly all the components before in some way or form. The videos are available on my Aasai Rasai YouTube channel, so click on the highlighted words and it will open a the recipe in a new window; Chicken Meat BallsEggplant Moju and Eggplant CurryChicken Curry although not the same as for the Lamprais, and Seeni Sambol. The ingredients are slightly different when they are in a lamprais, but it gave me some idea of how this is all going to end up. 

I gave myself an unrealistic 3 hours from start to finish including prep-time. However, with constant distractions in the form of my 3 kids, I ended up taking a total of 5.5 hours. That's including prep time. 

To make things as convenient and quick to a great extent, I opted to use store-bought, pre-cut, frozen and ready-to-use ingredients whenever possible. Since my family doesn't eat all meats, I made the Lamprais with chicken. For the Lamprais curry too, it was only chicken; frozen, diced, skinless, boneless chicken. 

I also used canned, low-sodium chicken broth for the rice, garlic and ginger powder (as I usually do in all my curries instead of fresh ginger/garlic), and frozen banana leaves. 

Click here for the video recipe on my YouTube channel Aasai Rasai. Or copy and paste the following link on your browser.


LAMPRAIS RECIPE (LAMPRIES)

Ingredients:


STOCK RICE RECIPE

2 1/2 cups parboiled rice 
4 3/4 cups chicken broth or water
2 1/2 ounces ghee or oil
1 big onion (sliced)
3-4 whole cloves
1/2 teaspoon ground green cardamom seeds
1 piece cinnamon (about 2-inch long)
*Salt as needed (see notes below)

Wash the rice in 7-10 changes of water until water is clear. Drain out the water and set aside. 
Fry the onions in hot oil on high heat. When translucent, add the spices and fry for a few seconds. Then add the rice, mix well for a minute.

Transfer rice to rice cooker, add all the broth or water & salt. Follow rice cooker directions to cook the rice. Fluff with fork. Set aside for later.

Or to cook the rice on stove-top, add all the liquid & salt as needed, cover and bring to a boil. Reduce heat to low. Continue to cook until rice is done. Fluff with fork and set aside.

*Note: If using regular stock containing salt, you may not need to add more salt. If using low-sodium stock or water, add about 1/2 teaspoon salt if preferred. 


BRINJAL PAHIE (EGGPLANT)RECIPE

Part-1 

1 1/2 lb BrinjalS (Eggplant)
1 teaspoon turmeric
1 1/2 teaspoons salt

Oil (for deep frying)

Cut eggplant into strips(like 1 cm thick french fries). Thoroughly mix all of the above. Leave aside undisturbed. After
45 minutes, squeeze out the liquid from the eggplant.

Deep fry eggplant in hot oil until dark golden brown. Pieces should be somewhat still fleshy after frying. 

Part-2

1/2 big onion (Sliced)
2 pandan leaves (rampe)
A few curry leaves 
1/4 teaspoon fennel seeds
2 pieces cinnamon
2 tablespoons oil 
2 green chillies (sliced)-Optional

Heat the oil. Fry all of the above until onions are a golden brown. Then add the following spices and mix for a few seconds: 

1/2 teaspoon curry powder
1/2 teaspoon paprika (or chilli powder)
1/4 teaspoon cumin powder
1/4 teaspoon ground ginger
1 teaspoon garlic powder

Then add the fried brinjals and coconut milk. Mix well. Add the following:

Salt to taste
1/4 cup coconut milk

Mix well until all the coconut milk has been absorbed and the pahie is oily. 

Finally add: 
2 tablespoons vinegar* (optional)
1/2 teaspoon sugar- (optional)

NOTE: I skipped the optional ingredients as seeni sambol was sweet enough for me and there was enough of the sour element in the blachan.


FRIED ASH PLANTAIN (OR GREEN PLANTAIN)

2 ash plantains or 1 large green plantain
1/4 teaspoon salt
1/4 teaspoon turmeric
Oil for deep frying 

Tip: Use the same oil from deep frying the eggplant

Peel and discard the ash plantain or plantain skin. Cut the plantain flesh into small cubes. Rub in the turmeric and salt. Leave aside for 5 minutes. Deep fry in medium-hot oil for about 2-3 minutes, or until light golden color.


CHICKEN CURRY

1/2 lb boneless/skinless chicken breast(cut into chunks)
1/2 big onion (sliced)
Few curry leaves
1/2 teaspoon curry powder
1/4 teaspoon turmeric powder
1 teaspoon paprika (or chilli powder)
1/4 teaspoon cinnamon powder
1/4 teaspoon ginger powder
1 teaspoon garlic powder
1/2 teaspoon ground green cardamom seeds 
2 Green chillies (optional- for heat)
1/2 cup coconut milk
Salt to taste
3 tablespoons ghee or oil(to saute onions)

Saute onions and curry leaves on high heat till onions are golden brown. Add the chicken. Mix for a minute or two. Add all the spices & a little salt (taste and adjust later). Cover and cook for a few minutes in its own liquid. When chicken is half-way cooked, add the coconut milk, reduce heat to medium-low, and simmer till chicken is completely cooked. Take it off the heat and set aside.

*If chicken is frozen and ready-to-cook, it takes about 10 minutes.If using defrosted chicken, it will take less time. If using bone-in chicken, add a little water and cook for 10 minutes. 


BLACHAN RECIPE

1 cup dried shrimp 
1/4 teaspoon ginger powder
1 teaspoon garlic powder
Juice of 3 limes

Dry-roast the dried shrimp. Add the garlic and ginger. Grind in a food processor until fine. Mix in lime juice to form a paste. 

SEENI SAMBOL RECIPE

2 big onions (finely chopped)
A few curry leaves
2-3 cloves
1/2 teaspoon ground green cardamom seeds
1 teaspoon paprika (or chilli powder)
1/2 teaspoon ginger
1 teaspoon garlic
1/2 teaspoon cinnamon powder
1 teaspoon sugar
2-3 tablespoons tamarind concentrate 
1-2 ounce oil 

Heat the oil on medium-high until hot. Saute onions and curry leaves till onions look translucent. Except the tamarind and sugar, add the rest of the ingredients into the onions and mix well. Reduce heat to low and cook uncovered for 30 minutes, stirring every 5 minutes to prevent burning. 


In 30 minutes add the tamarind concentrate. Mix well. Add the sugar. Cook for a further 10 minutes. Take off heat. Set aside. 


FRIKKADELS RECIPE (DUTCH FORCEMEAT BALLS)

1 lb ground chicken breast
3 tablespoons chopped dill 
1 1/2 teaspoons salt
1/2 teaspoon cinnamon powder
1/2 teaspoon clove powder
1/2 teaspoon cardamom powder
1/2 teaspoon black pepper
1 teaspoon garlic powder
1/4 teaspoon ginger powder
2 eggs (lightly beaten)
2 cups bread crumbs (more as needed)

Add 2 tablespoons breadcrumbs into the chicken. Reserve the rest of the breadcrumbs for coating. Add the rest of the ingredients into the chicken. Mix well. Make small balls. 
Beat the eggs with the fork. Dip and coat the balls in the egg. Roll in the reserved bread crumbs.
Pre-heat oil on medium-high heat. When oil is hot, fry the frikkadels until dark golden brown. Drain on paper towel. 


TO PREPARE THE LAMPRAIS PACKET

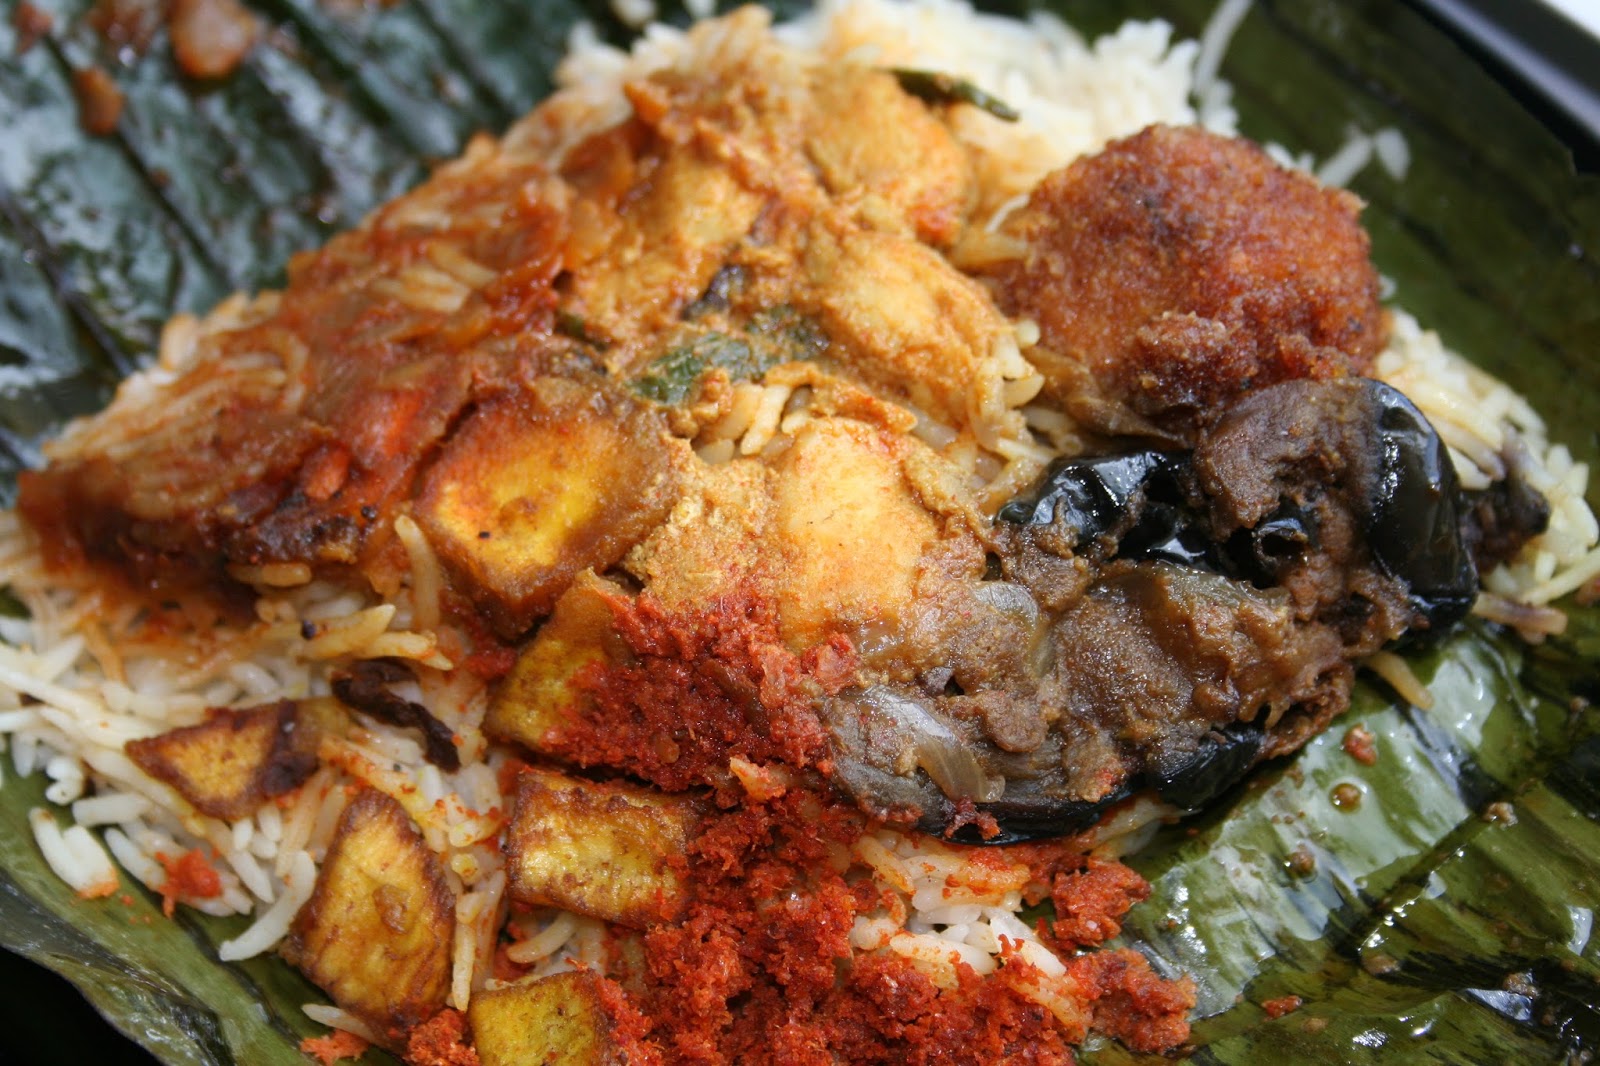
Place a foil on a tray and a banana leaf on the top of the foil. Serve 1/2 cup of the stock rice on the center of the banana leaf. Serve all the other sides on around and on the top of the rice. 

Sprinkle a tablespoon of coconut milk on the rice and curries to prevent drying out the rice when baking. 

Fold up the banana leaf and fold the two ends on the top. When the packet is open the curries should be on the top, and not under the rice.

Fold the pack in the foil snugly. 

Preheat oven to 375F. Bake for 10-15 minutes. 

Or do as I did and preheat oven to 375F. Turn it off. Place the packs of lamprais in the oven and walk away! Come back in 30-45 minutes to delicious, hot, fragrant Lamprais!


Wednesday, May 31, 2017

SRI LANKAN SWEET AND SPICY CANNED MACKEREL


Sri Lankan-style Sweet and Spicy Mackerel Curry by Aasai Rasai


Sri Lankan cuisine includes a variety of fish, being an island that it is. It is famous for stilt-fishing, a uniquely Sri Lankan, although dying tradition of fishing, used by some fishermen along the Southern Sri Lankan coast. A wooden stilt, usually made from a narrow but hardy small tree is embedded into the sand, several yards into the sea. It can hold only a single fisherman at a time. 
A fisherman sits on a wooden bar that is fixed at the top of the stilt. And this is how they would fish for several hours although the catch will be just a few small fish. 

Canned Mackerel is ever so popular and is enjoyed in many ways because it is cheaper than fresh fish, and is nutrient-rich. 

While it is rarely served in a curry for special guests or at celebrations, canned mackerel is guaranteed to be in the fillings of pastries such as cutlets, patties and rolls, or in bakery buns at the same feast! Click on the highlighted words to check out those recipes on the Aasai Rasai YouTube channel.

This is just one of the many different ways to make canned fish 
Sri Lankan-style. If you are thinking of a curry along the lines of something like a mackerel curry with a gravy, check my other recipe for Canned Mackerel Curry Sri Lankan Style.

Since I got a big bag of sweet mini peppers on sale, I thought of making the canned mackerel inspired my mother-in-law's recipe. She used 'Capsicums' as it is popularly known in Sri Lanka, or 'Maalu Miris' in Sinhala, which is widely available and affordable at any vegetable shop in Sri Lanka. 

At one time, the capsicum was the only type of peppers that was widely available, but that's changed over the years.

Click here to watch this recipe on my YouTube channel. Alternately, click or copy and paste the link below on your browser.

https://www.youtube.com/watch?v=UoM8wzeyzho


Sri Lankan Sweet & Spicy Canned Mackerel Curry

1 large can Chub Mackerel

5 mini peppers or capsicums (sliced) 
1 large onion (sliced)
1 small tomato (sliced)
few curry leaves
4 pieces pandan leaves
2 tablespoons vinegar
1/2 tablespoon ground black pepper
1 teaspoon garlic powder
1/2 teaspoon dry chillie flakes
1/2 teaspoon cardamom seeds (ground)
2-3 green chillies 
Salt as needed

Method:


  • Reserve the fish, and add liquid from the canned mackerel into a pan
  • Set the heat on high and into the pan,also add the other ingredients except the vinegar
  • Cover the pan and cook on high for 3-4 minutes
  • Stir, cover again and cook for another 3-4 minutes
  • By this time the onions will be translucent and cooked down
  • Now add the sliced peppers and mix well for about 30 seconds in an open pan
  • Add the fish & carefully mix well 
  • Cover and heat the fish through for 1 minute
  • Serve hot with noodles, rice & curry, bread or string hoppers to complete a delicous Sri Lankan meal!

Tuesday, May 30, 2017

SRI LANKAN OKRA SALAD (BANDAKKA/LADIES FINGERS) VEGAN/VEGETARIAN


An easy Sri Lankan okra salad that is a refreshing addition to your menu. 

In Sri Lanka, it is commonly known as 'Ladies' Fingers'. The Sinhala term is 'Bandakka', which is very similar sounding to the Tamil name 'Vendakkai'. The highlighted words take you to this recipe on video. 

What I love about this salad are the tangy flavors, the freshness of the ingredients and the semi-cooked, slightly crunchy texture of the okra. 

I make mine with frozen okra. One reason I use frozen vegetables whenever possible is that they are as fresh the day they were plucked, are cheaper, and ready to use. With no prep time before cooking, I can get more work done in my day. 

Never defrost vegetables before using unless it is indicated on the packaging. When using them even in curries, use frozen vegetables right out of the freezer just as you would use fresh vegetables.

This okra salad works well with both fresh and frozen okra. 

Frozen cut okra is usually cut into 1/2 -inch thick slices and exactly how thick it should be for this salad, because if it is sliced thinner than that, it would loosen up more seeds when warming it up while stirring. The other reason is that okra breaks easily when cooking, so thinly sliced okra will surely break up during mixing. 

While there are no strict ratios, this recipe can be a starting point if you are an emerging cook. Feel free to add as much or as little of the ingredients as you like. Double the recipe if you feel like it. The possibilities are endless!

Some Tips

-Use a wider pan to help the moisture evaporate faster.

-Use a pan that's large enough for the okra pieces to move around   freely. This prevents a soggy mess.

A wooden spoon works best when stirring the okra

- Do use a flat wooden spoon or a narrow, long wooden handle of a spoon if available to stir the okra. It helps the sliminess to adhere to the spoon and come off the okra.

Click here to watch the video on my YouTube channel. Or copy and paste the following link on your browser. 

https://www.youtube.com/watch?v=qcmZ0Ic3OAE


SRI LANKAN OKRA SALAD


Ingredients:

1 lb cut okra (fresh or frozen)
1/2 big onion (thinly sliced)
1/2 tomato (chopped)
2-3 green chillies (sliced diagonally)
Juice from 1/4 large lime (More if needed)
Ground pepper as needed
Salt to taste

Method:


  • Pre-Heat a heavy pan on high heat for 2 minutes (lighter pan wil take less time)
  • Add the okra & stir gently, preferably in a round motion to remove the sliminess from the okra 
  • Stop stirring for 30 seconds (keep the pan open)and start again. Continue this alternating pattern for 3-4 minutes
  • The okra will have a crunch at this stage unlike a curry where it can be really soft
  • In about 3-4 minutes the bottom of the pan turns brown from the dried up moisture
  • Turn off heat and transfer the okra immediately into a bowl 
  • Add all the other ingredients while the okra is still hot. Mix well
  • Taste for salt and adjust. Also adjust lime to your taste. Keep tasting and adjusting until it reaches a balanced flavor to your liking. 
  • Serve immediately. This Okra Salad turns pale (an olive green color) the longer it is kept due to the lime.


Monday, May 29, 2017

SRI LANKAN GREEN BEANS (DRY CURRY) VEGAN/VEGETARIAN

Green beans tempered in lightly roasted spices, and cooked down in water until dry. 

There is no gravy, but it is served along with other curries with milk-based gravy. 

A 'dry' curry is described as one that has significantly little or no gravy. It may be cooked down in water or milk (dairy or non-dairy).


Sri Lankan Green Beans Dry Curry by Aasai Rasai (Vegan/Vegetarian)
What makes my recipe for Sri Lankan Green Beans dry curry different, is a touch of brown sugar to balance out the flavors. It adds an element of mystery as is not at all noticeable in the curry, but it really heightens the natural flavors of this dish. 

Click here or on the highlighted links to open the video recipe on my YouTube channel. Or copy and paste the following link on your browser. 

https://www.youtube.com/watch?v=XqB0jiA5bKU


SRI LANKAN GREEN BEANS DRY CURRY

Ingredients:

340g (120z) green beans (frozen or fresh)
1/2 large tomato (chopped)
1/2 big onion (chopped)
1/4 teaspoon chilli powder
1/4 teaspoon cummin powder
1/2 coriander powder
1/2 teaspoon garlic powder
2 pieces cinnamon bark (2" pieces)
2 pieces pandan (rampe) leaves
A few curry leaves
A few green chillies (for heat)
1/2 teaspoon paprika (optional for color)
1 ounce oil
1 - 1.5 cups water


Method:


  • Dry roast the spices and herbs on medium heat (3-5 minutes)while storing constantly. 
  • Heavy pans take up to 5 minutes. Reduce to medium-low if pan becomes too hot.
  • Reduce the heat to low when spices look slightly moist from the essential oils and immediately add the green beans. Mix well.
  • Add the oil & mix to temper the green beans for about 2 minutes while tossing around. The spices should coat the beans well. 
  • Add the water. Note: Add about 1/4 less water to retain some of the crunch to the beans. 
  • Increase heat to medium high after adding water and cook covered. Check & stir in 10 minutes. Cover again and finish cooking until water has evaporated.
  • Finally add the sugar. Mix well. 

Serve with rice and other curries. To see more curries like this, visit my YouTube channel Aasai Rasai


SRI LANKAN CHICKEN CURRY RECIPE

Sri Lankan Chicken Curry Recipe by Aasai Rasai


Since uploading this video for my way of making Sri Lankan chicken curry, I have had a handful of reviewers on YouTube disputing the recipe's authenticity because I use a little yogurt/curd in the recipe. 

So let me clear up some doubts here. 

Firstly, Sri Lanka has always remained multi-ethnic, and Sri Lankan food reflects that. And no two chicken curries will ever taste the same because each family has their own preparation.

The cuisine is often infused with different ingredients and preparation methods originating from family recipes, and regional and ethnic influences.  

Any food that is claimed to be 'Sri Lankan' by anyone, does not imply only Sinhalese cuisine, just because Sinhalese are the majority of Sri Lanka's population. In fact, it actually reflects the food's origins in terms of geographical location, because that would be a strong indication of the unique ingredients, preparation and methods used. 

Also note that, in multi-ethnic families and communities, the food can have a blend of ingredients that are foriegn to someone who may not share similar family or background infuences in their own recipes. 

One such ingredient is the curd/yogurt used in this chicken curry

Being that I am a southern Sri Lankan Burgher/Sihnalese, my family often enjoyed curd with treacle, rice and curry, and curd with jaggery or sugar. Curd was everywhere in my laid-back, southern neck of the woods.

When we moved to Colombo, and met many wonderful, ethnically-diverse families, the food which was always central to everything social, included menus from family recipes and regions within Sri Lanka that reflected each family's roots. And the curd/yogurt was still present in recipes of my tamil friends, who merged with the Sinhalese through marriage , and brought their ingredients into traditional sinhalese food. The Muslims/Moors would do the same, and so did the Burghers and Malays etc. Think rose water in Sri Lankan Christmas Cake. How about Sri Lankan Devilled Chicken? These are examples that reflect a fusion of ingredients, yet they remain authentically Sri Lankan. 

My recipe for Sri Lankan Chicken Curry is no less a reflection of my own family roots and the culinery influences from being around a multi-ethinic family, and a diverse group of friends.

I invite you to try it out and enjoy it for what it is!

Click here to view the video. Or copy and paste the link below in your browser. 

https://www.youtube.com/watch?v=Nut1GOfhsgs


Good to know: 

Clean off some of the skin in the chicken and trim the fat to reduce oiliness of the curry.
To create more gravy, use more milk or water.
For a thicker gravy, use whole milk & whole milk yogurt
For a thinner gravy use low fat or skim milk yogurt and milk
Dairy milk can be substituted with coconut milk


SRI LANKAN CHICKEN CURRY RECIPE

Ingredients:

3 whole chicken legs 
1 big onion
1 large tomato
A few curry leaves
4 tablespoons oil
1 1/2 cups water
1/4 teaspoon turmeric powder
3 whole cloves
3 green cardamoms
1/2 cup curd/yogurt
3/4 teaspoon brown sugar 


Powdered Ingredients:- 

1 Teaspoon each of the following: 

Coriander, paprika, curry powder, garlic powder, cracked black pepper, salt


1/2 teaspoon each of the following:

Cinnamon powder, ginger powder, fennel seeds, dry chillie flakes

*Optional: 

2 green chillies (For heat- Optional)

1/2 cup milk (any dairy or non-dairy) for extra gravy


Method:


  • Warm the spices and curry leaves (except salt)for 3 minutes in a heavy-bottomed, medium-hot pan 
  • Add the chopped onions and tomato & mix well to coat the spices
  • Add the oil and cook for 2 minutes on medium-high heat, stirring all the time
  • Season with just a little salt. Adjust salt later when done cooking
  • Add the chicken and a little more salt if needed. Mix very well to coat the chicken with the other ingredients
  • Add the water and submerge the chicken as best you can to cover the chicken completely in water
  •  Turn up the heat to high, cover the pot & cook for 20 minutes. But about 10 minutes into cooking, turn the chicken over to help cook evenly 
  • In 20 minutes, mix in the sugar & yogurt or curd
  • Let the curd or yogurt dissolve and heat through for 5 minutes  
  • Then add the milk 
  • After adding milk, turn off the heat, cover the pan and leave it on the hot stove for a further 15-20 minutes 
  • It is now ready to enjoy!


SRI LANKAN TEMPERED ONIONS (LOONU THEL DALA)


Loonu Thel Dala is a simple popular preparation of tempered onions and a few spices. Not to be confused with 'Lunu' meaning salt in Sinhala, 'Loonu' (Onions) is sometimes spelled as 'Lunu' as well, so to avoid confusion, I have spelled it as it sounds. 

Tempering is a popular method in Sri Lankan cuisine to infuse extra flavors or spiciness into curries. It involves onions, curry leaves which is the base to tempering anything, and then other spices and condiments are added depending on what kind of dish is being made. A curry can be tempered at the start of cooking the raw ingredients, or it can be done at the end when the curry is fully cooked. 

To reduce the amount of oil that is usually needed for tempering the onions, I have wilted the sliced onions in a hot pan for about 3-5 minutes. That takes out some of the moisture, which reduces the absorption of oil by the onions. That little trick was given to me by a cook in Sri Lanka, about 25 years ago. 


The words 'Thel' and 'Dala' means 'oil' and 'put' or 'add'. Loonu Thel Dala simply translates to 'Onions in oil'. 

It is popularly enjoyed as a side dish with bread, stringhoppers, hoppers, kiribath, rice & curry, or in a sandwich (think vegetarian picnic sandwiches!) as it emulates Seeni Sambol which is a spicy jam-like side-dish made with onions. Although the ingredients are almost the same, the difference between the Seeni Sambol and Loonu Thel Dala is that the Seeni Sambol is slow cooked for about 1 hour (depending on the heat level and quantity, of course) to remove all the moisture so it can be preserved, while the Loonu Thel Dala takes about 10 minutes to cook and it cannot be preserved for long (use within 4 days). 

Sometimes I like to add a chopped tomato into the Tempered Onions, but this time I did not. So if you like that option, add the tomato after the onions have been wilted and along with the spices & herbs.

This recipe also uses tamarind concentrate (I used store bought). Tamarind extract used to be a very traditional and popular ingredient used in as an acid in curries especially in rural areas where limes may not be locally grown, or affordable. Tamarind trees grow abundantly in some parts of Sri Lanka, especially in dry zones. So they use tamarind more often in curries in those areas. The dry tamarind pulp (remove and discard the shell) is soaked in warm water for a few minutes. Then the pulp is 'washed' into the same water thus creating a tamarind extract, and the seeds are discarded. Use this extract in place of lime or vinegar in this Loonu Thel Dala recipe. 

Click here watch the video for the recipe for Sri Lankan Tempered Onions (Loonu Thel Dala) or copy & paste the following link on your browser:


Sri Lankan Tempered Onions (Loonu Thel Dala)

Ingredients:

2 big onions (thinly sliced)
2 pandan leaves
A few curry leaves
1-2 ounces oil
1/4 teaspoon sugar
1 tablespoon tamarind concentrate (or vinegar/lime/lemon juice)
3-4 whole cloves
1/2 teaspoon ground black cardamom seeds
A few pieces of cinnamon 
1/2 teaspoon ginger powder
3-4 green chilliesm(sliced)
1 teaspoon paprika (for color)
1/2 teaspoon dry chillie flakes (For heat. Adjust as needed)

Note: If using only chillie powder, you may skip the paprika and dry chillie flakes. Chillie powder already provides the color and the heat.

  • Pre-heat the pan until hot. Add the sliced onions & toss around for 3-5 minutes until wilted but not caramized
  • Add the oil & mix well for 30 seconds to 1 minute
  • Add the curry leaves & green chillies. Fry for a few seconds. If using tomato, add that too now
  • Except the acid of your choice (tamarind,lime/vinegar or lemon juice) add the rest of the ingredients
  • Reduce heat to medium, & allow the onions & spices to cook for about 5 minutes in an open pan while stirring constantly to prevent burning
  • Add the tamarind or the acid of your choice. Mix for about 30 seconds
  • Take it off the heat immediately & serve hot or cold with your favorite main dish.


SRI LANKAN MUSCAT RECIPE (MUSKET) VEGAN CANNED COCONUT MILK


There are two ways to make Sri Lankan muscat. One with coconut milk and coconut oil, and the other with ghee and vegetable oil. 

This recipe is the simpler, vegan way using canned coconut milk.
I have reduced the sugar and oil by 1/2 cup each.

Note that sometimes it is spelled Muscat and Musket, depending on each one's preference. I have not been able to verify which is correct, but since my old recipe books spell it as 'Muscat', I have opted for that. 

I have tried this with coconut cream, and thick canned coconut milk but it did not turn out well because of the high fat content unlike in milk extracted at home with fresh coconut and water. So to be able to still use canned coconut milk for convenience, I used one can of light coconut milk and 1 can of regular coconut milk. 


Also, try to get canned coconut milk that have the least, or preferably no added thickeners, preservatives and gums. This is very important to note because it ruins the texture of the muscat. Muscat should be firm enough that it is not jiggly. It should also be leathery, yet soft. It's a little complex to perfectly describe, but if you get a chance to try some authentic Sri Lankan muscat, you will get a good idea of what to aim for.

If the coconut milk is extracted at home, the muscat is firmer, transluscent and has a leathery texture, making it more authentic.

However, canned coconut milk is convenient and because this takes so long to cook, it's great to have an option that will reduce a few steps to making muscat.           
                     
Home-made Sri Lankan Muscat (Musket) by Aasai Rasai
Plan to dedicate 3 hours of your time to making this sweet delicacy. And don't plan on having this muscat lying around for too long either! 

The other important tip to remember is to add the food color when the muscat is closer to taking off the heat. If the food color is added much earlier, the dyes will only cook for too long, becoming dull and making the muscat look very a dirty pale, and unattractive color.

The muscat sets at room temperature. I used a 8" square cake pan to pour it into so that it can set into a square shape. It will take on the shape of the container. Always use a metal or glass container, never a plastic one. It took six hours to completely cool in the center of the muscat.

Click here to watch how I made this Sri Lankan muscat. Or click, or copy and paste the following link. It will open the YouTube recipe in a new tab. 

https://www.youtube.com/watch?v=kAqY9eFlpo4


SRI LANKAN MUSCAT RECIPE MUSKET)WITH CANNED COCONUT MILK


CAUTION: The muscat is very sticky and extremely hot. Do not attempt to taste or touch it at any point during cooking.


Ingredients:

8oz all purpose flour 
4 cups water (for flour-water mixture)
1 can 'lite' coconut milk (13.5 oz size)
1 can regular coconut milk (13.5 oz size)
9 cups water (to thin down coconut milk)
4 cups sugar
4 oz liquid coconut oil (melt if using solid)

3-5 tablespoons rose water

Optional:

Food color
Ground cardamom Seeds

Method


  • Mix about 1 cup out of the 4 cups water, with the flour to make a firm yet smooth ball of dough.For faster results, use slightly warm water.
  • Fully submerge the ball in what is left of the 4 cups water. Flatten the ball if needed. Let it remain undisturbed for 3-6 hours.
  • Rub the dough ball with the fingers in the same bowl of water to wash off the flour. The gluten will remain in a mass. Save the flour-water, and discard the rubbery gluten mass.
  • Strain the flour-water mixture using a fine-mesh strainer or muslin cloth. Discard any gluten residue in the strainer. Save the flour-water mixture.
  •  Into a heavy-bottomed pan, add the flour-water mixture, sugar, all the coconut milk and the 9 cups water. 
  • Cook on medium-low heat stirring constantly. 
  • After 30 minutes add the oil. Keep Stirring.
  • Any time after 2 hours add the cashew nuts and ground cardamom seeds.
  • After cooking for almost 2 1/2 hours add the rose water, and food color 
  • Continue to cook while constantly stirring and scraping the bottom of the pan
  • The mass will become thick and hard to mix. It will come off the pan and feel like it is floating around as it follows the movement of the spoon when stiring.
  • Pour into a deep cake pan, preferably 8" sqaure or a loaf pan that is not plastic. Leave undisturbed until set. 
  • It can be kept at room temperature for weeks, if indoor temperatures are regulated.
  • Store in the refrigerator to retain freshness if outside temperatures are extremely hot.  

CAUTION: The muscat is very sticky and extremely hot.Do not attempt to taste or touch it at any point during cooking.